Tuesday, December 28

corn & potato bisque

When we ate in Paris, many places served bisque-type smooth soups as the first course. Because Taylor raved about each one, I bought an immersion blender as soon as we got home. He will typically try any soup I attempt so I've enjoyed trying new things and basically throwing in whatever veggies I have in the fridge, frozen in the freezer or canned in the pantry. This is was my second time using the blender, and thought this soup turned out really well. It was yummy and satisfying on this cold, rainy day. Blending cooked potatoes allows you to make a creamy soup without actually having to add cream or even milk. Since I almost never have milk on hand and don't really like the idea of eating a soup made with cream as my meal, pureeing potatoes has been perfect.


corn and potato bisque
Serves 2 if that's dinner, or 4 as a first course
{ingredients}
2 tablespoons olive oil
1/2 cup chopped onion
2 teaspoons minced garlic
5 small potatoes, peeled and cut into 1-inch cubes
3 cups chicken stock
1 1/2 cup fresh or frozen corn kernels
1/4 teaspoon ground cayenne pepper
1 teaspoon each ground nutmeg, ground cinnamon, ground pepper, kosher salt
1/2 teaspoon black pepper
1/2 teaspoon dried parsley
{directions}
In a large saucepan or soup pot, heat oil over medium heat. Cook onions until soft, add garlic and sauté 2 to 3 minutes. Add potatoes, stir to coat with onions and garlic, add a pinch of salt and dried parsley as well. Add stock and bring to a boil.
Reduce heat and simmer until potatoes are soft, about 10 minutes. Add 1 cup of corn and remaining spices, allow to simmer a few minutes longer. Remove from heat. Using an immersion blender or a food processor, purée contents of pot, in batches if necessary, until smooth.
Add remaining 1/2 cup of corn. Taste, adjust seasonings and serve. I typically leave my soups on warm until we are ready to eat (or until Taylor is home!) I think they just get better as the flavors combine.

Wednesday, November 3

old people cookies

....also known as Mexican Wedding Cookies or maybe Sandies. But these remind me of visiting elderly family in West Texas and of old ladies and the Baptist potlucks.


I think I have memories of them from my childhood because their unique shape caught my eye and the powdered sugar stuck to my fingers. They remind me of holidays. So when I found a recipe originally published in the New York Times for "Viennese Almond Crescent" cookies, I thought they sounded good and set out to recreate my West Texas memories


Mexican Wedding Cookies
Makes about a dozen cookies 
1/2 cup ground almonds (I used my food processor)
1/2 cup confectioners’ sugar
1/2 cup softened unsalted butter
1 1/2 teaspoon vanilla extract
1 teaspoon almond extract
1 cup all-purpose flour
1/8 teaspoon salt
1/2 cup vanilla sugar (I used powdered sugar), for coating
Whisk together the ground almonds and confectioners’ sugar in a bowl.
In a stand mixer, beat butter on medium speed for several minutes until smooth.
Add in the almond mixture and mix until combined. Add in the vanilla and almond extracts and mix until combined. Add in the flour and salt and mix on low just until combined and the dough starts clumping together.

Turn dough out onto a piece of plastic wrap, wrap tightly, and chill for about 20 minutes.
When you are ready to bake the cookies, preheat the oven to 350°F. Line a few cookie sheets with parchment paper or silicone baking mats.
Form dough into 1-inch balls. Roll into a log and curve the ends to make a crescent shape. Place on cookie sheets about 1 1/2 inches apart.

Bake for about 12 to 15 minutes, rotating sheets halfway through; the edges of the cookies should turn light brown but the tops should not get too dark. Cool on sheets for about 4 to 5 minutes. While they are still warm, sift sugar over the cookies. Let them finish cooling on wire racks. They are best enjoyed the day they are made, but you can store them in an airtight container between sheets of wax paper for 2 weeks.

{thoughts}
As they baked, they did not seem done after about 13 minutes but once they cooled, they seemed good. They may look really undercooked and there was a huge variety of baking times in the recipes I looked at, some up to 30 minutes! So I still don't know if I should have cooked them longer. They were really good but fell apart easily. I doubt cooking time would have effected that though and they may have just turned into biscotti or something, lacking egg.


Thursday, October 28

banana gingerbread muffins

These turned out great! So seasonal! Taylor liked them and according to my calculations, right under 200 calories each. These are my kind of muffin, more dense and quickbreadish, rather than a cake.

I think you could also substitute a cup of pumpkin for the cup of mashed banana, but the banana is sweeter than pure pumpkin so you may be missing out on some sweetness, if that's what you expect from your muffins.


Banana Gingerbread Muffins
makes 1 loaf of bread or 12 muffins
{ingredients}
1 cup whole wheat flour
1 cup all purpose flour
1/2 tsp baking powder
1/2 tsp baking soda
1/2 tsp salt
1 1/2 tsp ground ginger
1 1/2 tsp ground cinnamon
1/2 tsp ground allspice
1/2 tsp ground cloves
1/4 tsp ground cardamom
pinch freshly ground nutmeg
1/2 cup brown sugar
1 cup banana, mashed (about 2 large)
1/2 cup molasses
1/2 cup buttermilk*
4 tbsp oil

{directions}
Preheat oven to 350F. Lightly grease a 9×5-inch loaf pan or 12 cup muffin pan or place paper liners in muffin pan. (as you can see I had to use fall liners)

In a large bowl, whisk or sift together flours, baking powder, baking soda, salt and spices.
In a medium bowl, whisk together brown sugar, banana, molasses, buttermilk and vegetable oil. Pour into dry ingredients and stir until just combined. Pour into prepared pan and sprinkle with coarse sugar, if desired.

Bake muffins for about 20-25 min and loaf about 45 min, until a toothpick inserted into the center comes out clean.


*make your own buttermilk by adding 1/2 t. vinegar to 1/2 c. skim milk and letting it sit about 3 minutes.

Sunday, October 24

sudden saturday sugar cookies

I wished I had halloween sprinkles and black piping icing when I randomly decided to make these on a saturday afternoon.


I made these partially because I thought it would be fun to decorate halloween cookies, but mostly because I had three egg yolks in the fridge, crying out not to be wasted. And this recipe fit the bill!

{"melt in your mouth" sugar cookies}
via Better Homes and Gardens' The New Cookbook
{ingredients}
1/2 c. butter, softened
1/2 c. shortening
2 c. sugar
1 teaspoon baking soda
1 teaspoon  cream of tartar
1/8 teaspoon salt
3 egg yolks
1/2 teaspoon vanilla
1 3/4 c. all-purpose flour
{directions}
In a large mixing bowl beat butter and shortening with an electric mixer on medium high for about 30 seconds. Add sugar, baking soda, cream of tartar and salt. Beat until combined, scraping sides of bowl occasionally. Beat in egg yolks and vanilla until combined. Beat in as much flour as you can. Stir in remaining flour.

Shape dough into 1 inch balls. Place 2 inches apart on an ungreased cookie sheet. Bake in a 300 degree oven about 15 minutes or until sides are set but not brown. Cool on cookie sheet for 1 minute. Transfer to wire rack and let cool.

Sunday, October 17

raisins pecan oatmeal cookies

These are also known, as of 2pm, October 17, 2010, as the Best Cookies Ever.

Ina says, "I consider myself and oatmeal cookie aficionado and I've been searching for decades for the perfect recipe. Finally! These are crisp on the outside and chewy on the inside with lots of chunky raisins and toasted pecans."

There is nothing more to say.

{raisin pecan oatmeal cookies}
from Ina Garten's Barefoot Contessa: Back to Basics
Ingredients
1 1/2 cups pecans
1/2 pound (2 sticks) unsalted butter, at room temperature
1 cup dark brown sugar, lightly packed
1 cup granulated sugar
2 extra-large eggs at room temperature {yes, i used Jumbo eggs}
2 teaspoons pure vanilla extract
1 1/2 cups all-purpose flour
1 teaspoon baking powder
1 teaspoon ground cinnamon
1 teaspoon kosher salt
3 cups old-fashioned oatmeal
1 1/2 cups raisins
Directions
Preheat the oven to 350 degrees F.
Place the pecans on a sheet pan and bake for 5 minutes, until crisp. Set aside to cool. Chop very coarsely. {i bought chopped pecans from the CM bulk bin}
In the bowl of an electric mixer fitted with the paddle attachment, beat the butter, brown sugar, and granulated sugar together on medium-high speed until light and fluffy. With the mixer on low, add the eggs, one at a time, and the vanilla.
With a sifter or a mesh strainer, sift the flour, baking powder, cinnamon, and salt together into a medium bowl. With the mixer on low, slowly add the dry ingredients to the butter mixture. Add the oats, raisins, and pecans and mix just until combined.
Using a small ice-cream scoop or a tablespoon, drop 2-inch mounds of dough onto sheet pans lined with parchment paper. Flatten slightly with a damp hand. Bake for 12 to 15 minutes, until lightly browned. Transfer the cookies to a baking rack and cool completely. For chewier cookies allow them to cool on pan. {do this!}

Friday, October 1

pumpkin pie for lunch.

we're just taking this to a new level.


it's october! 


{pumpkin pie for lunch}
combine the following {with a vigorous spoon or a blender}


one cup fat free fage Greek yogurt
three tablespoons pumpkin puree
one half a banana {not necessary, and seems weird but it sweetens it!}
one tablespoon Stonewall Kitchen Maple Pumpkin Butter
one fourth a cup chopped toasted pecans or almonds
a dash of pumpkin pie spice
graham cracker crumbs


yum.

Thursday, September 30

a match made in heaven

one tablespoon

+

one to two cups

=

{love}

toppings? toasted pecans, diced peaches, cinnamon granola...

Tuesday, September 28

fall stuffed squash

how cute is that round "8 ball zucchini"??? kinda reminds me of cinderella's carriage. 

goal: reproduce stuffed bell pepper and make more fallish.

why i hesitate to share this recipe:
there are not many measurements or times. i just threw a bunch of stuff together that i thought sounded and looked good at Central Market today. it’s very adaptable to your preferences, cravings and current kitchen stock.


but. what is essential here:
  1. a zucchini squash vessel. a lighter crispier squash was a good light flavor and crisp to go with the creamier, heartier filling. i don’t think a more dense, hearty, almost nearer potatoey butternut squash or pumpkin vessel would have worked as well. plus i found perfect little ball shaped zucchinis! they were more “seedy” (heh. pun) than long zucchini, which you could certainly use, so not as much of their pulp was as usable. in my opinion. but the cooked outside and layer of flesh left was perfect with the filling.
  2. butternut squash, though next time i want to try pumpkin!
  3. toasted pecan pieces: crunch and flavor. i just toasted them on pan in same 400 degree oven til crispy and fragrant, about 4 minutes
  4. a good cheese that can hold its own. parmigiano reggiano has done wonders to my stuffed bell peppers and i liked the manchego cheese i tried today.
  5. pumpkin pie spice and brown sugar (partially cuz it’s fun. partially cuz it’s good)


{fall stuffed squash}
place 3 “8 ball zucchini squash,” with tops cut off * and 1/2 butternut squash face down in baking dish with a bit of water in the bottom.
bake in a 400 degree oven, covered with foil for 30 min, or until tender. i finished the squash in the microwave. 
while the squash are baking:
saute diced onions until tender in olive oil on medium heat
season with kosher salt and cracked pepper
add chopped cremini mushrooms and a bit of butter
saute til tender, but not all the way wilty
reduce heat to low and add
roughly chopped roma tomatoes
more kosher salt and cracked pepper
cover and simmer for about 10 minutes
uncover, increase heat a bit and stir, breaking up tomatoes and allowing liquids to reduce significantly
mix in about a fourth a cup good bread crumbs or cooked brown rice**
stir in pulp {flesh?} from zucchini and butternut squash
and a few dashes of pumpkin pie spice, pepper and brown sugar to taste
stir to combine for a few minutes and season to taste
remove from heat and stir in:
grated Manchego cheese
generous amounts of toasted pecan pieces***
a bit of parsley
fill hollowed zucchini squash with mixture, top with more cheese, 
cover in foil and bake for 10-15 minutes in 375 degree oven, removing foil about half way through.
top with more cheese and parsley if desired
*or large zucchini, halved, lengthwise (will need less cooking time)
**did brown rice, will try bread next time, not even sure if it’s necessary but the rice was nice for texture


  excuse my phone pics!

Thursday, September 23

chai tea latte concentrate

'tis the season for spicy warm drinks like pumpkin spice and chai tea lattes. i got a chai tea latte today from central market and it was glorious. however, since i can't be shelling out the big bucks each afternoon, morning, evening... that i get a craving, i pulled out this recipe i'd been saving for at home, on-demand, chai tea lattes.


Chai Latte Concentrate
from foodie with family
Ingredients:
  • 12 Chai tea bags
  • 4 cups cold, fresh water
  • 1 1/2 cups milk
Place the tea bags, cold water and milk in a medium saucepan over high heat.  Bring to a boil.  When you reach the boil, drop the heat to medium and simmer for 15 minutes.  After 15 minutes, remove the pan from the heat and squeeze the tea bags to extract as much flavor and liquid as possible.  Discard tea bags and transfer the Chai Latte Concentrate to a heat-safe container, like a glass Ball jar. Allow to cool to room temperature, put a tight fitting lid on the container and store in the refrigerator for up to 12 days.
To prepare a Chai Latte: (it's really flexible, adjust to your taste)
Ingredients:
  • 1/3- 1/2 cup of milk (use whole milk or even half and half to make a creamy, rich one)
  • 1/2- 2/3 cup of Chai Latte Concentrate
  • 1-3 teaspoons, to taste, of sweetener.  Foodie recommends agave nectar. I used Splenda and skim milk but may try adding real sugar with the milk and warming it together stovetop then topping with whipped cream and some cinnamon or pumpkin pie spice. I also found decaffeinated chai tea bags, which was a plus!
yum!

Monday, July 19

quesadillas. a tutorial.

this is for hallie and macey.
{quesadillas}
serves 1
INGREDIENTS
2 good tortillas 
a big handful of grated cheese {monterey jack is usually what you find in mexican food quesadillas but any cheese is good. feta, cheddar, parmesan... use whatever you have}
shredded chicken from a rotisserie chicken
or rinsed and drained black beans from a can of black beans
or some chopped baby spinach
1 tablespoon of butter
tools needed:
a skillet {non-stick is easier to deal with, but i think regular skillets make better quesadillas}
a spatula {any kind will work. i use a wide, rubber spatula}
a pizza cutter is recommended
DIRECTIONS
heat the skillet on medium high on the stove top, about a 7. on a plate or cutting board assemble your quesadilla, layering half the cheese on one tortilla, adding beans, meat or whatever else, then sprinkle the rest of the cheese. it's ok if it seems full, when the cheese melts, it won't be. leave a little border around the edge of the tortilla so the cheese doesn't ooze out while it's cooking. and top with the other tortilla. 
place the butter in the skillet and swirl the pan or stir it around until it melts. when the butter starts bubbling a bit, place your quesadilla in the pan. as that one side cooks, press down on the top tortilla with your fingers, especially around the edges, this will make it easier to flip. cook about 2-3 min, or until the bottom starts looking crisp and brown in spots.
  
then flip. slide a spatula under it, hold it with the top with your hand and flip in one quick motion. if it splatters or the tortilla folds it's ok, fix it. it may be messy but it will still taste good. press down a bit with your fingers and cook 2-3 min on this side, till tortilla is brown in spots. remove, allow to cool and cut. i think it's easiest to cut quesadillas with a pizza cutter.

{to make it extra good, and to be sure the second side doesn't stick, you could take the quesadilla out, place another tablespoon of butter to melt in the pan, then flip it.}

good luck!

Sunday, July 11

cilantro pesto & the grown up gringo's green chicken tenders

pat on the back for creativity.


the grown up gringo's green chicken tenders with cilantro ranch dip
serves 2
INGREDIENTS
for this recipe you’ll need a skillet with a lid and i used a non-stick one.
2 T. butter
2 T. olive oil
2 chicken breasts cut in half lengthwise into strips and pounded into even thickness
3 tomatillos, roughly chopped
1/3 - 1/2 c. corona beer
1 c. flour + seasoning salt + onion powder + cumin + paprika
1/4 c. cilantro pesto, see recipe below
1/4 c. ranch dressing
DIRECTIONS
marinate chicken breasts in 3 T. cilantro pesto, coated evenly, for at least 1 hour. 
combine remaining pesto with ranch dressing to make cilantro ranch dip. to taste.
heat butter and oil in skillet to medium high until bubbly. dredge pesto covered chicken cutlets in seasoned flour and brown in skillet about 4 minutes each side. remove from pan. add tomatillos to pan and cook, stirring occasionally till browned and softened, about 3 minutes. add beer to skillet, reduce heat a bit, and stir till reduced to about half the original amount. return chicken to pan and cover, cooking about 3 minutes on each side or until internal temperature reaches 170.
serve with cooked tomatillos, saucy bits from the pan and chopped avocado. spoon cilantro ranch dip over tenders or serve on the side. would also be good with this.
{cilantro pesto}
yields approx. 1/4 c.
4 c. cilantro leaves (the leaves from 2 bundles of cilantro)
1 jalapeno, seeded and chopped
1-2 T. olive oil
1 T. cumin
3/4 T. garlic powder
1 T. white sugar
combine all ingredients in food processor. freezes well.

this pan cooked chicken, albeit confusing with its mexican flavors, turned out really good and helped me use up some cilantro pesto i'd made last week, with no clear intention regarding its usage. this was also my first time cooking with tomatillos, and i thought the way the beer cooked and caramelized them was SO yummy. they were sweet and a little spicy at the same time. awesome. 

cooking smaller pieces of chicken in the skillet helps everything stay crispy and flavorful. i think a non stick skillet with a lid is the best way to cook chicken here in our grill-less apartment life.

Sunday, July 4

spinach pesto provolone pizza

I promise I make more than pizza. Taylor really liked this variation, so even though I've posted lots of pizza recipes, I figured this would be worth sharing. I bought pesto in bulk the other day from Costco and divided it up into about 1/2 c. portions to freeze. Now I take one out whenever I want to make anything with pesto! So glorious.


spinach pesto provolone pizza 
dough adapted from Smitten Kitchen
{dough}
1 1/4 cup all purpose flour + 1/4 cup whole wheat flour
1 teaspoon salt
3/4 teaspoon instant yeast
1/2 cup warm water (may need up to 1 or 2 tablespoons more)
1 tablespoon olive oil
1 tablespoon honey
{toppings}
1/3 c. grated colby jack cheese
3 T grated provolone cheese {I ripped up a large, thick slice intended for sandwich making}
1/4 c. pesto
1/4 c. finely chopped spinach
garlic powder
cracked black pepper
DIRECTIONS
Measure flour in a large bowl, make an indentation and measure the yeast and salt. Pour warm water water over the mix and stir lightly until yeast and salt are dissolved. Add honey and olive oil, stirring entire mixture. Mix in mixer with dough hook for about 5 minutes, adding more flour if too sticky, until dough forms a ball and pulls away from the sides of the bowl. Or knead by hand, 8 minutes or so until a piece of it stretches in your hand without breaking. 

Dough should be stretchy and not easily break when pulled but should not be sticky or get stuck easily on your hands. If it doesn't stretch and is too firm, thick feeling after kneading for a while, add a tiny bit of water. If it's too sticky after kneading for a while, add more flour. Kneading introduces air to the dough and builds up gluten, it's really hard to over knead so once it's the right feeling, knead two min or so more.

Lightly oil a bowl with cooking spray (you can use the same rinsed one you made the dough in) Dump in the dough, turn it over so all sides are coated, cover it in a cotton dishtowel leave it undisturbed for about two hours (ideally in a warm, undrafty place) until it has doubled in size. To speed up this process you can also place in an oven on 150 and it should double in size in an hour. It's ready when two fingers pressed firmly leave an indentation and the dough does not bounce back into shape.*

Oven to 500. Stretch dough out thinly into desired shape on pizza pan or cookie sheet. Should make a circle at least 14 inches in diameter (depending on how long it's had to rise) Spread pesto, sprinkle spinach, top with cheeses. Sprinkle garlic powder over all, generously on the crust. Bake 8-10 minutes until crust is lightly browned. Sprinkle freshly ground cracked black pepper over warm cheese.

*I usually double this dough and after the rise, divide it in half and freeze half in a well sealed freezer ziploc. Once I'm ready to use I let it thaw either in the fridge or on the counter until I'm ready to use it. Once it's thawed in the fridge or even at room temperature, it's still sort of rising so keep that in mind. Roll it out a bit more thinly if it's had lots of time to thaw then rise and it may make a thicker crust. ...but it can't ever really be messed up!

Monday, June 28

overnight cinnamon rolls.

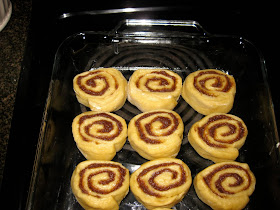
well, i finally tried these! i adapted my friend megan's recipe using one that i also had from alton brown (my idol) to come up with something that i could make the night before and have minimal work in the morning. i used AB's dough but meg's filling and icing. these were definitely a task but were SO good. taylor said they tasted exactly like the ones he likes from The Kitchen Door...that i used to get him (too) often the first summer we were married until they cruelly closed their lake austin blvd location. but alas! i can make them at home and they're SO good! these will definitely become a staple of special mornings @ our house.


{overnight cinnamon rolls}
adapted from here and here
yields 12-15 rolls
time the night before: 2 hours
time the morning: 1 hour
INGREDIENTS
{dough}
4 large egg yolks, room temperature
1 large whole egg, room temperature
2 ounces sugar, approximately 1/4 (I did 1/3 cup)
3 ounces unsalted butter, melted, approximately 6 tablespoons
6 ounces buttermilk, room temperature
20 ounces all-purpose flour, approximately 4 cups, plus additional for dusting
1 package instant dry yeast, approximately 2 1/4 teaspoons
 1 1/4 teaspoons kosher salt
Vegetable oil or cooking spray
{filling}
6 tbsp unsalted butter at room temperature
1 cup brown sugar packed
2 tbsp cinnamon
pinch of salt
{icing}
6-8 ounces cream cheese at room temperature
1 cup powdered sugar
1/4 cup unsalted butter, room temperature
1/2 teaspoon vanilla extract
DIRECTIONS
For the dough: in the bowl of a stand mixer with the whisk attachment, whisk the egg yolks, whole egg, sugar, butter, and buttermilk. Add approximately 2 cups of the flour along with the yeast and salt; whisk until moistened and combined. Remove the whisk attachment and replace with a dough hook. Add all but 3/4 cup of the remaining flour and knead on low speed for 5 minutes. Check the consistency of the dough, add more flour if necessary; the dough should feel soft and moist but not sticky. (I ended up using a little more than 3 and 2/3 total) Knead on low speed 5 minutes more or until the dough clears the sides of the bowl. Turn the dough out onto a lightly floured work surface; knead by hand about 30 seconds. Lightly oil a large bowl. Transfer the dough to the bowl and toss to coat in oil, cover and let double in volume, 2 to 2 1/2 hours. For faster rise, Cover bowl with a kitchen towel. Let dough rise in a 150 degree oven for an hour until doubled in size.
Combine the brown sugar, cinnamon and salt in a medium bowl. Cut the butter into the dry ingredients with two knives or a pastry cutter until it resembles crumbs. Set aside until ready to use.


Butter a 9 by 13-inch glass baking dish. Turn the dough out onto a lightly floured work surface. Gently shape the dough into a rectangle with the long side nearest you. Roll into an 18 by 12-inch rectangle. Spread the filling mixture evenly over the dough, leaving a 3/4-inch border along the top edge; gently press the filling into the dough. Beginning with the long edge nearest you, roll the dough into a tight cylinder. Firmly pinch the seam to seal and roll the cylinder seam side down. Very gently squeeze the cylinder to create even thickness. Using a serrated knife, slice the cylinder into 1 1/2-inch rolls; yielding 12 - 15 rolls. Arrange rolls cut side down in the baking dish; cover tightly with plastic wrap and store in the refrigerator overnight or up to 16 hours. {I put the odd end pieces of the roll in baking dish too to fill up the pan and it worked perfectly. I had 14 rolls and 3 little odd end twists.}
Remove the rolls from the refrigerator, uncover, and place in an oven that is turned off. Fill a shallow pan 2/3-full of boiling water and set on the rack below the rolls. Close the oven door and let the rolls rise until they look slightly puffy; approximately 30 minutes. Remove the rolls and the shallow pan of water from the oven.
Preheat the oven to 350 degrees F.


When the oven is ready, place the rolls on the middle rack and bake until golden brown, or until the internal temperature reaches 190 degrees F on an instant-read thermometer, approximately 25 - 30 minutes.


While the rolls are baking, make the icing. In a mixer with the whisk attachment, mix the cream cheese, sugar, butter, and vanilla on low until incorporated, occasionally scraping down sides when necessary. Then beat at medium-low until fluffy. Spread over the rolls and serve immediately.


yay!